


Agricultural Literacy Curriculum Matrix
Lesson Plan
Enjoying the Harvest
Grade Level
Purpose
Students identify the parts of a wheat plant and wheat kernel and investigate the process of milling wheat kernels into flour. Grades 3-5
Estimated Time
Materials Needed
Engage:
- Loaf of white bread or photo
- Loaf of whole wheat bread or photo
- Wheat kernels
- White flour
- Whole wheat flour
Activity 1: Wheat Kernel Dissection Model
- Anatomy of a Wheat Plant Diagram, 1 per student
- White Bread vs. Whole Wheat Grain video
- Wheat stem, 1 per student (Wheat stems can be obtained from a local farmer or Wheat Bundles are available for purchase from agclassroomstore.com.)
- Jewel bag*, 1 per student
- 8 1/2" x 11" piece of paper, 1 per student
- Wheat Kernel Dissection Image, 2 per student
- 8 1/2" x 11" piece of lined paper, 3 per student
- Brads, 1 per student
- Glue sticks
- Scissors
- Hole punches
*Jewel bags are available for purchase from agclassroomstore.com.
Activity 2: From Grind Stones to Roller Mills
- Tools for grinding grain (two stones, mortar and pestle, coffee grinder, spice grinder, pepper grinder, hand or electric wheat grinder, etc.)
- A Wheat Grinder Kit is available for purchase from agclassroomstore.com.
- Wheat seeds (Hard red wheat seeds can be purchased from the grocery store.)
- Bowls
- History of Flour Milling Timeline
- Wheat Milling video
Activity 3: Tortillas in a Bag
- Bread, Bread, Bread by Ann Morris
- Tortillas in a Bag Recipe
- 1-quart plastic resealable storage bag, 1 per group
- Wheat flour, 1 1/2 cups per group (Use the freshly ground wheat flour from Activity 2. Store bought flour can be added to ensure there is enough flour for each group.)
- Baking powder, 1 teaspoon per group
- Shortening, 2 tablespoons per group
- Hot water, 1/2 cup per group
- Salt, 1/4 teaspoon per group
- Griddle
- Spatula
Vocabulary
bran: the multi-layered, hard outer covering of a kernel of cereal grain
endosperm: tissue formed within a seed that contains energy (starch) and protein for the germinating seed
germ: the embryo of a cereal grain seed
grain: the edible seed or seed-like fruit of grasses that are cereals (such as wheat, corn, and rice)
mill: a machine used in treating (by grinding, crushing, stamping, cutting, or finishing) raw material
photosynthesis: the process by which plants convert carbon dioxide, water, and light energy into sugars and oxygen in order to store energy; the opposite of cell respiration
Did You Know?
- Wheat was first planted in the United States in 1777 as a hobby crop.1
- Today, wheat is grown in 42 states in the United States.1
- In the United States, one acre of wheat yields an average of around 40 bushels of wheat. One bushel of wheat contains approximately one million individual kernels and yields approximately 42 pounds of white flour or 60 pounds of whole wheat flour.1
- Ancient traditional tortillas in Mexico were made from ground corn. Flour tortillas only started to become popular in the 19th century.1
Background Agricultural Connections
Bread has been an important part of the human diet since early times. Loaves baked over 5,000 years ago have been found in ancient Egyptian tombs. Wheat has been discovered in pits where human settlements existed 8,000 years ago. In the Stone Age, solid cakes were made from crushed wheat. Bread provided ancient civilizations with a reliable food source.
The wheat plant has four basic parts—roots, stem, leaves, and head. The roots anchor the plant in the soil, absorbing water and nutrients and transporting them to the stem. The stem supports the head and helps transport nutrients and water throughout the plant. The leaves are responsible for photosynthesis. The head of the wheat plant contains the wheat seeds, also referred to as kernels or berries.
Wheat flour is made from the kernels of the wheat plant. The kernel is the seed from which the wheat plant grows. A wheat kernel contains three distinct parts—the bran, germ, and endosperm. The bran is the multi-layered, hard outer covering of the kernel. Bran consists of important antioxidants, B vitamins, and fiber. The germ is the embryo or sprouting section of the kernel. It is the part of the wheat kernel that will sprout and grow into a new wheat plant. During the milling process, the germ is often separated from the flour because its fat content limits the flour's shelf-life. The germ contains B vitamins, protein, minerals, and healthy fats. The endosperm is the germ's food supply. In its natural state, the endosperm provides essential energy to the young wheat plant, allowing the plant to send roots down into the soil to absorb water and nutrients and shoot sprouts up for sunlight.
In Neolithic times, saddle stones (cradle-shaped pieces of hard stone) and hand stones (cylindrical-shaped stones) were used to crush grain into coarse flour. In the Stone Age, hand-powered rotary querns consisting of a rotating circular stone on top and a stationary stone on the bottom to grind grain. In the 18th century, automated stone wheels, powered by wind or water, rose in popularity as a method of flour production. The invention of the roller mill in the middle of the 19th century increased the productivity of flour mills. Commercial flour mills today still use the roller mill, however they are utilizing the advances in modern technology to improve the efficiency, reliability, and safety of flour production.
When wheat arrives at the mill, it is weighed, tested, cleaned, and conditioned. To condition the wheat kernels, water is added to the grain in order to toughen the outer part of the wheat and soften the inner part. The wheat then rests for about twelve hours. Steel rollers break open the grain to release and separate the endosperm from the bran and the germ.The starchy endosperm is ground and sifted several times to make white, all-purpose flour. When making whole wheat flour, the bran and germ is put back into the white flour at the end of the milling process. The flour is then packed into bags to be transported to stores, bakeries, and food processing plants.
Engage
- Show the students a loaf of white bread and a loaf of wheat bread, or use the attached photos. Draw a Venn diagram on the board. Label one circle "White Bread" and the other circle "Whole Wheat Bread."
- Ask the students to explain what is the same and different about the two loaves of bread, and record the responses in the appropriate spots of the graphic organizer.
- Show the students a bowl of wheat kernels, a bowl of white all-purpose flour, and a bowl of whole wheat flour. Point out that the white flour was used to make the white bread and the whole wheat flour was used to make the whole wheat bread, but both types of flour were made from wheat kernels. Explain to the students that they will be exploring the process of making flour, known as milling, to understand how different types of flour are made from wheat kernels.
Explore and Explain
Activity 1: Wheat Kernel Dissection Model
- Provide each student with the Anatomy of a Wheat Plant Diagram, a wheat stem, and a jewel bag. Use the diagram to discuss the main parts of a wheat plant and have the students locate the parts on the wheat stem.
- Tell the students to thresh their wheat to separate the seeds from the plant. Refer to the Wheat Grinding Tutorial Video for instructions on how to thresh wheat by hand. The students should collect the wheat seeds in their jewel bags.
- Explain to the students that each kernel of wheat has three main parts—the bran, germ, and endosperm. All-purpose flour, used to make white bread, is made from the endosperm of the wheat kernel. The endosperm is separated from the bran and the germ and ground into flour. Whole wheat flour contains the whole kernel—the bran, germ, and endosperm.
- Pass out a piece of paper to each student. Instruct them to fold the paper into thirds and label the sections "Bran," "Germ," and "Endosperm." Using the information from the Background Agricultural Connections section of this lesson, discuss the three parts of the wheat kernel and have the students take notes about each part on their paper.
- Show the students the video White Bread vs. Whole Wheat (Grain) and have them take additional notes about the three parts of the wheat kernel.
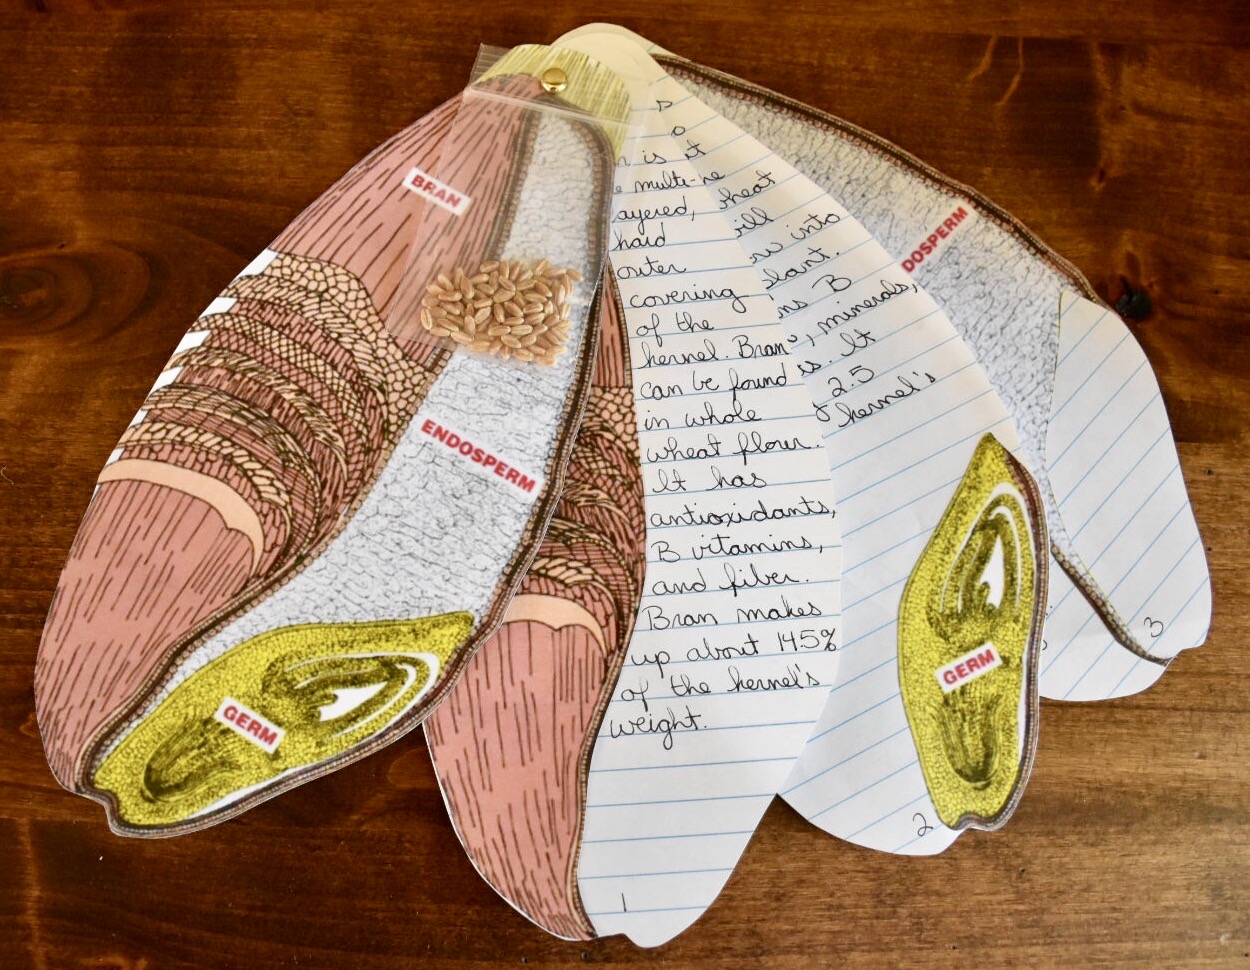
- Provide each student with two copies of the Wheat Kernel Dissection Image, three pieces of lined paper, a brad, scissors, and a glue stick. Have them cut out both of the Wheat Kernel Dissection Images. Trace one of the images onto three pieces of lined paper, cut each lined kernel out, and number each page. Set one of the Wheat kernel Dissection Images aside and cut the bran, germ, and endosperm apart from the other.
- Glue the bran image on page 1 of the lined kernels, the germ on page 2, and the endosperm on page 3.
- Using their notes, have the students write a description of each part of the wheat kernel on the corresponding page.
- Layer the wheat kernel model with the jewel bag of wheat seeds on top followed by the intact Wheat Kernel Dissection Image, page 1, 2, and 3. Punch a hole in the top of the packet and attach with a brad.
Activity 2: From Grind Stones to Roller Mills
- Choose a minimum of three tools for grinding grain and place them on tables around the room with a bag of wheat kernels and a bowl to collect flour at each station.
- Have students try their hands at milling flour with the different tools by allowing them to circulate through the stations. Save any flour that is successfully produced to be used in Activity 3.
- After every student has had a turn at each station, invite the class to describe their experiences with each tool. Ask students which method they thought was most effective and if they can think of any better ways to grind wheat.
- Explain that thousands of years ago, people used stones to crush grain into flour. Over time, more productive machines were invented. Use the History of Flour Milling Timeline to view and discuss the different technologies used throughout history to mill flour.
- Show the students the video Wheat Milling to view a modern flour mill at work.
Activity 3: Tortillas in a Bag
- Read the book Bread, Bread, Bread by Ann Morris and discuss the different
 types of bread from around the world that are featured in the book.
 - Tell the students that they are going to use the wheat flour they made in Activity 2 to make tortillas, a type of bread from Mexico. Explain that the tortillas will be whole wheat tortillas because the flour they milled contains the bran, germ, and endosperm of the wheat kernel.
- Gather the ingredients listed in the Activity 3 section of the Materials list and have students wash their hands.
- Divide students into small groups. Provide each group with a Tortillas in a Bag Recipe, the ingredients listed on the recipe, and a 1-quart plastic resealable storage bag.
- Model each instruction on the recipe for the students before they begin.
- Place the wheat flour, salt, and baking powder in a 1-quart resealable storage bag. Close the bag and shake just a few shakes to mix the ingredients.
- Add the shortening and close the bag. From the outside of the bag, work the bag with your hands until the mixture looks crumbly and there are no pieces of the shortening visible.
- Open the bag and add the hot water. Knead the bag until the dough is one large piece and the sides of the bag come clean.
- Take the dough out of the bag and divide it into four equal pieces. Lay the dough on a tray and place the bag on top of the pieces. Allow the dough to rest for 15 minutes.
- After the dough has rested, have the groups roll or pat it into 8-10 inch circles. If the dough is too sticky, add more flour.
- Heat the griddle to medium or medium high. Place the dough onto the griddle and cook until dark brown spots appear. Turn and cook on the other side.
Elaborate
-
Play the My American Farm interactive game Amazing Grains.
-
View the video How It's Made Flour to learn more about how wheat kernels are milled into flour.
-
Have students research the nutritional differences between white bread and whole wheat bread.
-
Sprout wheat kernels to grow wheat grass.
- Rinse wheat kernels thoroughly in a colander.
- Place the rinsed wheat kernels in a container and cover with water.
- Soak overnight.
- Rinse the wheat kernels again.
- Cover the opening of the container with a piece of cheesecloth and secure with a rubber band.
- Lay the container on its side in a dark place.
- Rinse and drain the berries each morning until they sprout and grow to about one inch in length.
- When the sprouts have grown to about one inch in length, place the container in a sunny window for one day.
- Enjoy your wheat grass on a sandwich, salad, or make wheat grass smoothies.
Evaluate
After conducting these activities, review and summarize the following key concepts:
- The seeds or kernels of the wheat plant are located in the head of the wheat stalk.
- Each kernel of wheat has three main parts—the bran, germ, and endosperm.
- The flour used to make white bread is made from grinding the endosperm of the kernel.
- The flour used to make whole wheat bread is made from grinding the whole kernel—the bran, germ, and endosperm.
Recommended Companion Resources
- A True Book: Wheat
- Amazing BREAD Processing- How It's Made Inside a Factory
- America's Heartland: Wheat Episodes
- Bread Comes to Life
- Bread Comes to Life
- Bread Lab!
- Bread in a Bag
- Bread is for Eating
- Bread, Bread, Bread
- Everybody Bakes Bread
- From Wheat to Bread
- Fry Bread: A Native American Family Story
- Hero for the Hungry: The Life and Work of Norman Borlaug
- Let's Get Growing!
- My American Farm
- The Boy Who Changed the World
- Wheat
- Wheat Bundle
- Wheat Germ DNA Necklace
- Wheat Grinder
- Wheat Kernel Samples
Author
Organization
 |
We welcome your feedback! If you have a question about this lesson or would like to report a broken link, please send us an email. If you have used this lesson and are willing to share your experience, we will provide you with a coupon code for 10% off your next purchase at AgClassroomStore. |